Introduction
The GRGDOv3 was specifically designed to support a thread based network or a standard WiFI6 setup. Thread and ESPHome are well suited for Home IoT based automation and especially for the DIY space. ESPHome can augment Thread based systems by extending the scope of devices while supporting standard products such as Matter Classification based services. This setup guide provisions two possible paths for implementation within Home Assistant . You can run your own completely local YAML for full control of the device path or use the default Dashboard import and modification path. The Import path will copy remote YAML and store them locally for fully offline use so either method has no cloud operational dependency during any internet disruption. It simply makes it easier to get up and running. You can also use the GRGDOv3 to explore and learn Thread behaviors and maintain the WiFi6 option should you decide to keep WiFi.
We offer a low cost RCP (Radio Control Processor) ready to use USB Serial RCP dongle to explore Thread with.
It’s important to note that GRGDOv3 and it’s ESP32-C6 will not run RATGDO or Homekit firmware’s, if those capabilities are desired then the GRGDOv2 is the right solution. Currently an ESP32-C6 will only run SecplusGDO firmware as it needs ESP-IDF framework for OpenThread code.
For WiFi based installs jump to WiFi Configuration
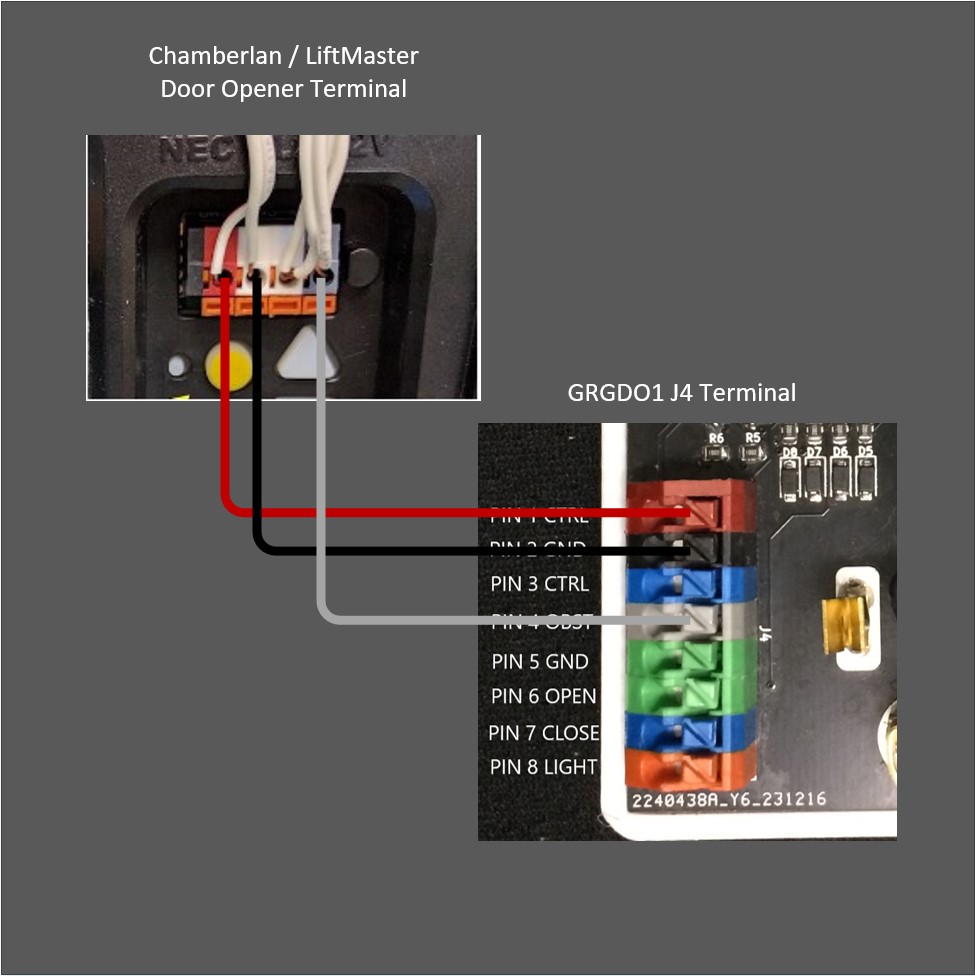
Example Wired Connection
Prerequisites for Thread Base Operation
Expectantly, you will need a pre existing Thread Network and its TLV key along with the ESPHome Builder HA add-on with a properly configured secrets file.
(Type-Length-Value) is a data serialization format used in the Thread networking protocol to encode information exchanged between devices. The network TLV contains sensitive data and needs to be placed in ESPHome’s secrets YAML file where it can be retrieved more securely.
In general you need keep any keys, userID’s, SSID’s or passwords that are used for ESPhome devices in the secrets file. It’s a best practice. The Dashboard import method requires for the TLV and will fail to work without it.
The TLV variable needs to be defined like shown in this secrets YAML file with your dynamically generated ones and the other wifi and api values must be setup as well.
Your unique encryption key can be generated from this URL Native API Component – ESPHome – Smart Home Made Simple↗
# Your Wi-Fi SSID and password
wifi_ssid: "MySSID"
wifi_password: "MyPassword"

api_encryption_key: "3dvlaffPPY+v71eE7uSW9oAFNN8EU0Mr5AztmG+t2lo="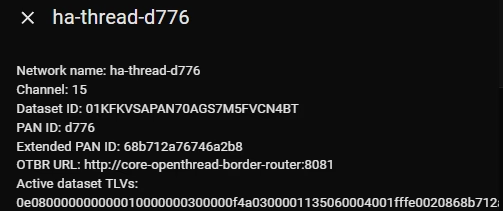
tlv: "0e080000000000020000000300000e4a0300000f35060004001fffe002083e3fa35c1828bf6d0708fd1782faf76db1710510610428be61141753a1f101b9f8e94713030e68612d7468726561642d3764646301027ddc04102ca263dacef7bf57fd7a562d74b7dc610c0402a0f7f8"You can locate an HA based Thread Router TLV form the setting->thread selection

Setting up the GRGDOv3 with Thread in this embodiment initially uses WiFi capability to add it to the Thread network. This approach simplifies attaching an unmanaged ESPHome device into any Home Assistant based Thread network. The process uses the secrets YAML file and variables in remote device YAML github repos to facilitate the Thread configuration. Here is a brief summary of the steps:
- A captive portal is used to add the device to local WIfi on the same layer 2 network. (Improv serial can also be used)
- The GRGDOv3 ESPHome device is discovered and a Specific Thread based YAML is imported on ESPHome’s dashboard.
- Your device naming is set in the import process.
- The device install process is invoked and the preset Thread network TLV secret variables are retrieved from the ESPHome secrets file.
- ESPHome builder uses the current active WiFi connection to OTA flash its new Thread based configuration and upon reset will connect to the Thread network using it’s TLV based configuration parameters.
- From this point forward the device will be running a local IPv6 connection and thread protocol.
We can start with onboarding the GRGDOv3 device on to a network with the captive method, this will facilitate either a Thread of WiFi configuration target.
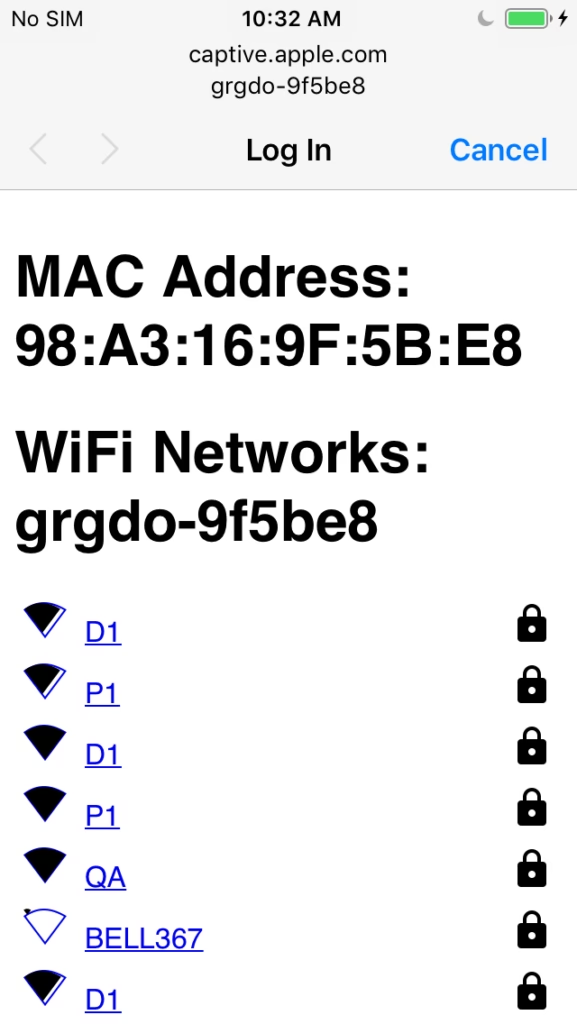
The shipping firmware boots with a MAC address name extension as the captive portal AP name it will be the likes of grgdo-9f5be8. Be sure write it down so you can later identify you’re working with the right device.
Using a phone it the most convenient way to join the GRGDOv3 to WiFi.
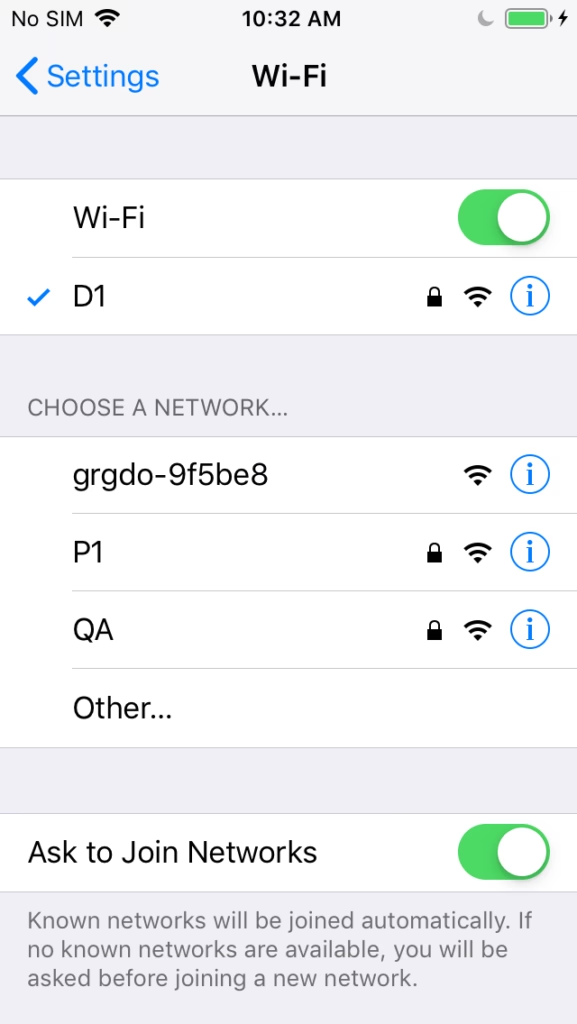
Select the grgdo-9f5be8 AP
Select your SSID or you can scroll down and enter one.
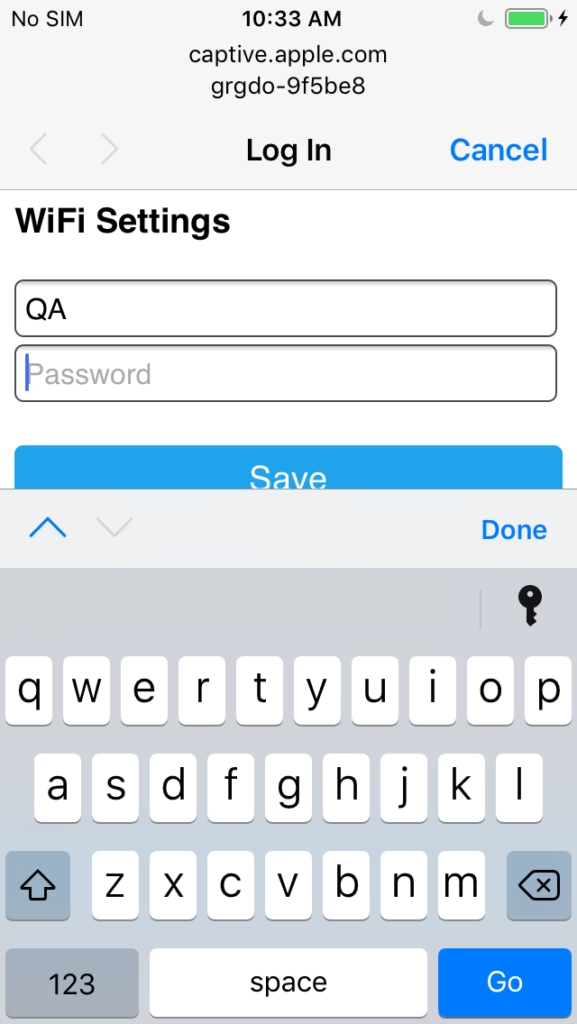
Enter the password and Save it.
From this point the device will issue mDNS multicasts on the local network. Note that multicast do not normally cross IP subnets. The GRGDOv3 device should be on the same IP subnet as Home Assistant runs on.
Adding the the GRGDOv3 in the next step and is done from the ESPHome Dashboard. It will be discovered automatically and you simple need to take control of the device show here.
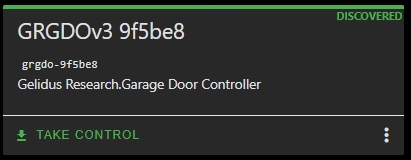
If it not shown click SHOW in the upper right corner of the Window.
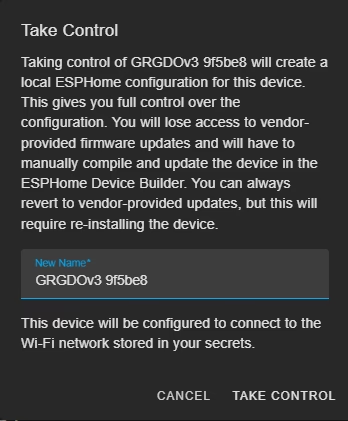
Name the device as you wish or just use it as is. Then take control of it.
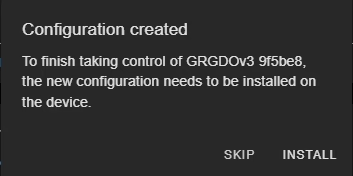
You will need to edit the automatically imported YAML.
Select skip and close and edit.
Switching the imported YAML to Thread requires setting the dashboard import to a Thread based file, commenting out any WiFi dependent components and adding the Thread components. The example can be used with your currently generated substitutions. Just replace the example substitutions with the ones created on import. Once this is done you can install the new configuration over the current WiFi connect while its active. After the reboot it will be purely Thread based on an IPv6 local network.
(The configuration can be done with automation on boot but would require a specific request for the Thread based firmware. This file is imported for Thread operations https://github.com/GelidusResearch/grgdo/blob/main/grgdov3-board-secplus-gdo-thread.yaml)
external_components:
- source: github://gelidusresearch/esphome-secplus-gdo
  components: [secplus_gdo]
  refresh: 1d

substitutions:
  device_name: grgdo
  device_comment: Garage Door Controller
  device_type: ESP32-C6-H4 WiFi6 BT5 IEEE802.15.4 Single Core + LP Core 160MHz
  disp_name: GRGDOv3
  id_prefix: grgdov3
  friendly_name: "GRGDOv3"
  branch: master
  uart_tx_pin: GPIO5            # J4 Pin 1 or 3 Red CTRL
  uart_rx_pin: GPIO4            # J4 Pin 1 or 3 Red CTRL
  input_obst_pin: None #GPIO20        # J4 Pin 4 Grey OBST - not required with secplus_gdo
  dry_contact_open_pin: GPIO21  # J4 Pin 6 Green
  dry_contact_close_pin: GPIO22 # J4 Pin 7 Blue
  dry_contact_light_pin: GPIO23 # J4 Pin 8 Orange
  tof_sda_pin: GPIO11           # GPIO11 = v3, GPIO26 = v2 board, GPIO3 = v1 board
  tof_scl_pin: GPIO10           # GPIO10 = v3, GPIO25 = v2 board, GPIO1 = v1 board
  dht22_pin: GPIO19             # AUX1:GPIO10, AUX2:GPIO19 = v3, AUX1:GPIO26 = v2, AUX1:GPIO3 = v1 board
  status_pin: GPIO6
  garage_door_cover_name: Garage Door
  garage_light_name: Garage Light
  garage_openings_name: Garage Openings
  garage_lock_name: Lock
  garage_motion_name: Motion
  garage_obstruction_name: Obstruction
  garage_motor_name: Motor
  garage_button_name: Wall Button
  garage_sync_name: Synced

esphome:
  name: ${device_name}
  friendly_name: ${disp_name}
  name_add_mac_suffix: false
  project:
    name: "Gelidus Research.Garage Door Controller"
    version: "1.0.0"
  on_boot:
    - priority: -100
      then:
        lambda: id(${id_prefix}).start_gdo();

esp32:
  board: esp32-c6-devkitc-1
  flash_size: 4MB
  variant: esp32c6
  framework:
    type: esp-idf

# This board configuration enables the correct pins for the ESP32-C6.
# The v3 board has different pin assignments for the AUX ports
# AUX1 (4Pin): GPIO11 and GPIO12, AUX2 (3Pin): GPIO19
# The ToF and DHT22 sensors are connected to the AUX1 and AUX2 ports respectively. AUX1: ToF, AUX2: DHT22
# You can use them for other DIY components as needed. Do not exceed 250ma of total current on these pins.

# While RATGDO path are included, the ESP32-C6 board does not support RATGDO features at this time.
# RATGDO needs to be refactored to work with the ESP-IDF framework at this time.
# For now only SecPlus GDO features are supported on the ESP32-C6 board.

packages:
  remote_package:
    url: https://github.com/gelidusresearch/grgdo
    files:
#      - path: packages/ratgdo-base.yaml                    # enable base RATGDO firmware                   - Not supported on ESP32-C6
#      - path: packages/ratgdo-secplusv1.yaml               # enable RATGDO Security+v1 support and outputs - Not supported on ESP32-C6
#      - path: packages/ratgdo-secplusv2.yaml               # enable RATGDO Security+v2 support and outputs - Not supported on ESP32-C6
#      - path: packages/ratgdo-drycontact.yaml              # enable RATGDO Dry Contact support and outputs - Not supported on ESP32-C6
#      - path: packages/secplusgdo-secplusv1.yaml           # configure SecPlus GDO Security+v1 outputs
      - path: packages/secplusgdo-secplusv2.yaml           # configure SecPlus GDO Security+v2 outputs
#      - path: packages/secplusgdo-tof.yaml                 # enable ToF sensor
#      - path: packages/grgdo-dht22.yaml                    # enable DHT22 sensor (any firmware)

    ref: main
    refresh: 1s

dashboard_import:
  package_import_url: github://gelidusresearch/grgdo/grgdov3-board-secplus-gdo-thread.yaml@main
  import_full_config: true


# Enable logging
logger:

# Enable Home Assistant API
api:
  encryption:
    key: !secret api_encryption_key

ota:
  - platform: esphome              # Works with Thread networks however ota updates will be slower than WiFi
    #password: !secret ota_password
  - platform: web_server           # Works with Thread networks


network:
  enable_ipv6: true

openthread:
  device_type: MTD
  tlv: !secret tlv
  force_dataset: True

safe_mode:                         # Highly recommended when making frequent changes

web_server:                        # Works with Thread networks and will be slow on initial load
  port: 80
  version: 3
#  username: !secret web_user      # enable for minimal security
# password: !secret web_password # needs secrets file entries created firstThis guide is a WIP more content will follow when time permits.
WiFi Network Connection
To setup a WiFi based instance you need to use the following package based YAML:
This YAML will auto generate the name to grgdo-xxxxxx where xxxxxx in the MAC address suffix. If you prefer to override it just set the device_name: substitution value as desired and comment out name_add_mac_suffix: true
external_components:
  - source: github://gelidusresearch/esphome-secplus-gdo
    components: [ secplus_gdo ]
    refresh: 1d

substitutions:
  device_name: grgdo
  device_comment: Garage Door Controller
  device_type: ESP32-C6-H4 WiFi6 BT5 IEEE802.15.4 Single Core + LP Core 160MHz
  disp_name: GRGDOv3
  id_prefix: grgdov3
  friendly_name: GRGDOv3
  branch: master
  uart_tx_pin: GPIO5            # J4 Pin 1 or 3 Red CTRL
  uart_rx_pin: GPIO4            # J4 Pin 1 or 3 Red CTRL
  input_obst_pin: None #GPIO20        # J4 Pin 4 Grey OBST - not required with secplus_gdo
  dry_contact_open_pin: GPIO21  # J4 Pin 6 Green
  dry_contact_close_pin: GPIO22 # J4 Pin 7 Blue
  dry_contact_light_pin: GPIO23 # J4 Pin 8 Orange
  tof_sda_pin: GPIO11           # GPIO11 = v3, GPIO26 = v2 board, GPIO3 = v1 board
  tof_scl_pin: GPIO10           # GPIO10 = v3, GPIO25 = v2 board, GPIO1 = v1 board
  dht22_pin: GPIO19             # AUX1:GPIO10, AUX2:GPIO19 = v3, AUX1:GPIO26 = v2, AUX1:GPIO3 = v1 board
  status_pin: GPIO6
  garage_door_cover_name: Garage Door
  garage_light_name: Garage Light
  garage_openings_name: Garage Openings
  garage_lock_name: Lock
  garage_motion_name: Motion
  garage_obstruction_name: Obstruction
  garage_motor_name: Motor
  garage_button_name: Wall Button
  garage_sync_name: Synced

esphome:
  name: ${device_name}
  friendly_name: ${disp_name}
  name_add_mac_suffix: true
  project:
    name: "Gelidus Research.Garage Door Controller"
    version: "1.0"
  platformio_options:
    build_flags:
      - -Wl,--wrap=esp_panic_handler
  on_boot:
    - priority: 800
      then:
        - lambda: id(${id_prefix}).start_gdo();

esp32:
  board: esp32-c6-devkitc-1
  flash_size: 4MB
  variant: esp32c6
  framework:
    type: esp-idf
    sdkconfig_options:
#      CONFIG_ESPTOOLPY_FLASHSIZE_4MB: y
#      CONFIG_BT_BLE_50_FEATURES_SUPPORTED: y
#      CONFIG_BT_BLE_42_FEATURES_SUPPORTED: y
#      CONFIG_OPENTHREAD_ENABLED: n
      CONFIG_ENABLE_WIFI_STATION: y
#      CONFIG_USE_MINIMAL_MDNS: y
#      CONFIG_LOG_DEFAULT_LEVEL_VERBOSE: y

# With packages you can more easily tune your configuration by
# adding or removing variations as needed.
# Just uncomment the lines for the features you want to enable.
# This base configuration enables the correct pins for the ESP32-C6 board
# Be aware the the v3 board has different pin assignments for the AUX ports
# AUX1 (4Pin): GPIO11 and GPIO12, AUX2 (3Pin): GPIO19
# The ToF and DHT22 sensors are connected to the AUX1 and AUX2 ports respectively. AUX1: ToF, AUX2: DHT22
# You can use them for other DIY components as needed. Do not exceed 250ma of total current on these pins.

# While RATGDO path are included, the ESP32-C6 board does not support RATGDO features at this time.
# RATGDO needs to be refactored to work with the ESP-IDF framework at this time.
# For now only SecPlus GDO features are supported on the ESP32-C6 board.

dashboard_import:
  package_import_url: github://gelidusresearch/grgdo/grgdo-v3.yaml@main
  import_full_config: false

packages:
  remote_package_files:
    url: https://github.com/gelidusresearch/grgdo
    files:
#      - path: packages/grgdo-dht22.yaml                    # enable DHT22 sensor
#      - path: packages/grgdo-secplusgdo-tof.yaml           # enable ToF sensor
#      - path: packages/grgdo-secplusgdo-ultrasound.yaml    # enable Ultrasonic as a distance sensor
      - path: packages/secplusgdo-secplusv2.yaml           # configure SecPlus GDO Security+v2 outputs
    ref: main
    refresh: 1d

# Enable logging
logger:

# Enable Home Assistant API
api:

ota:
  - platform: esphome                # Works with Thread networks however ota updates can be slow with USB dongles
    #password: !secret ota_password  # Recommended to enable setting a password once the config is established
  - platform: web_server             # Works with Thread networks slow on initial load, may even time out

wifi:
  ssid: !secret wifi_ssid
  password: !secret wifi_password

  # Enable fallback hotspot (captive portal) in case wifi connection fails
  ap:
    ap_timeout: 20s

captive_portal:                      # Comment out with Thread networks

improv_serial:                       # Comment out with Thread networks

safe_mode:                           # Highly recommended when making frequent changes

web_server:                          # Works with Thread networks and will be slow on initial load
  port: 80
  version: 3
#  username: !secret web_user        # enable for minimal security
#  password: !secret web_password    # needs secrets file entries created first