This GDO setup guide provides two methods to add the GRGDO1 to an ESPHome/Home Assistant instance. You can add a new device and flash the firmware with a physical device connection via USB serial or you can add it using the pre installed GRGDO1 WIFI Captive portal and upload the firmware via OTA. The WIFI Captive portal method is by far a more convenient method since we only need a cell phone to establish your local WIFI connection. If the method chosen is the captive portal then you can install GRGDO1 physically and proceed to configure it remotely using your phone and ESPHome/Home Assistant after approximately one minute of power on time.
For Secplus GDO firmware see https://github.com/GelidusResearch/device.docs
Important information:
- If you are not familiar with AC mains safety please consult with or hire an electrician to connect the GRGDO1 v1 board.
- You should NEVER connect to a live AC mains supply during the install or while the case is open.
- Always use an non-metallic fire safe enclosure to house the GRGDO1, (Included with the GRGDO1-KIT)
- The ESPhome Home Assistant Add-on is required – see: https://esphome.io/guides/getting_started_hassio.html
GDO Setup Guide – ESPHome Device Preparation
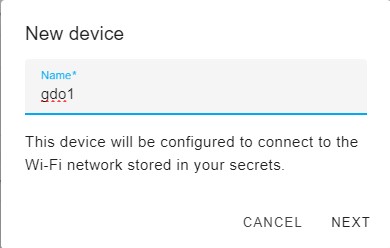
To start we create a unique device name like gdo1 since the preloaded firmware contains it it will speed up the editing later, once created we can edit the config to host the GRGDO1 pin set.
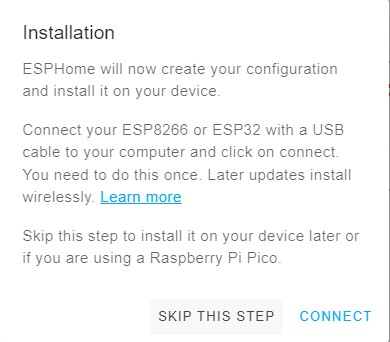
Since we are appending to the YAML config we can skip this step. We need to add a full configuration from the content in this guide.
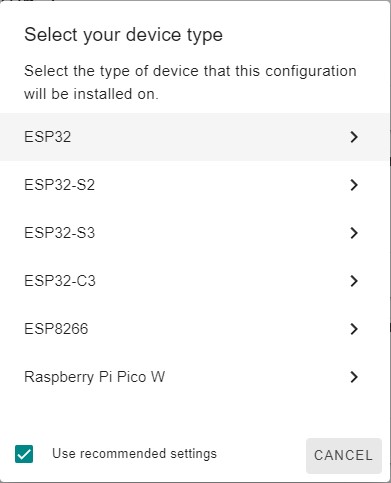
The GRGDO1 is powered with an ESP32 as shown we need to set it and skip the next prompt.
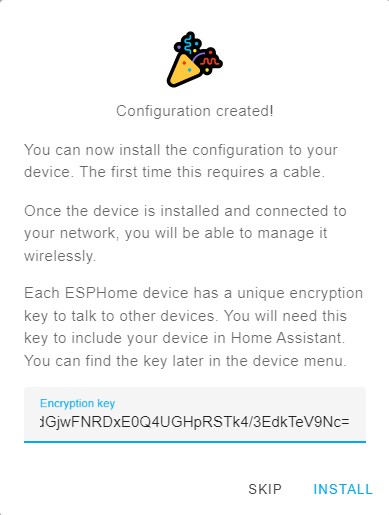
Skip this step and note the generated unique key, this must be preserved in the config going forward.
GDO Setup Guide – YAML Configuration
Now we can edit the newly created device named gdo1, preserving the API, OTA and passwords generated from ESPHome while adding additional GRGDO1 YAML parts as shown. Note: the secplusv2 protocol selection default, older units may need secplusv1. You can also set the source to the RATGDO Github URL for non ToF installs. We provide an alternate here to ensure upstream changes are well tested for good code quality and to support the longer range VL53L1X ToF range sensor.
# GDO setup guide ver 2026.03.16
# The VL53L1X ToF Sensor on RATGDO firmmare requires the GelidusResearch Repo
external_components:
  - source:
      type: git
      url: https://github.com/gelidusresearch/esphome-ratgdo.git
      ref: 1.3.1
    components: [ ratgdo ]
    refresh: 1d

esphome:
  name: gdo1
  friendly_name: gdo1
  project:
    name: ratgdo.esphome # Required for homebrige-ratgdo uses
    version: "1.0"

esp32:
  board: esp32dev
  framework:
    type: arduino

# Enable logging
logger:
  baud_rate: 115200 # Disable logging with baud_rate: 0 when running a ToF or DHT sensor on a v1 board otherwise set to 115200 (faster logging improves response time)

# Enable Home Assistant API
api:
  encryption:
    key: "<your key>"  #Preserve this entry

ota:
  - platform: esphome # post 2024.5.x
    password: "<your password>"  # recommened but can be ommited for testing
#  - platform: web_server         # File based web ui upload - factory image default

# factory image defaults - recommend not re-enabling esp32_improv for improved security
# improv_serial:
# esp32_improv:
#   authorizer: none

wifi:
  power_save_mode: none
  ssid: !secret wifi_ssid          # Check the secrets file for the correct values
  password: !secret wifi_password  # Ditto

  ap:
    ssid: "gdo1"
    password: ""

captive_portal:

web_server:
  port: 80
  version: 3
#  username: !secret web_user      # enable for minimal security
#  password: !secret web_password  # needs secrets file entries creatde first

safe_mode:

preferences:
  flash_write_interval: 300s


substitutions:
  id_prefix: gdo1
  friendly_name: "GDO1"
  uart_tx_pin: GPIO22           # J4 Pin 1 Red or 3 Blue to Opener Red CTRL terminal
  uart_rx_pin: GPIO21           # J4 Pin 1 Red or 3 Blue to Opener Red CTRL terminal
  input_obst_pin: GPIO23        # J4 Pin 4 Grey OBST
  dry_contact_open_pin: GPIO18  # J4 Pin 6 Green
  dry_contact_close_pin: GPIO19 # J4 Pin 7 Blue
  dry_contact_light_pin: GPIO17 # J4 Pin 8 Orange
  tof_sda_pin: GPIO26           # GPIO26 = v2 board, GPIO3 = v1 board
  tof_scl_pin: GPIO25           # GPIO25 = v2 board, GPIO1 = v1 board
  i2c_sda_pin: GPIO25           # GPIO25 = v2 board, GPIO1 = v1 board
  i2c_scl_pin: GPIO26           # GPIO26 = v2 board, GPIO3 = v1 board

ratgdo:
  id: ${id_prefix}
  input_gdo_pin: ${uart_rx_pin}
  output_gdo_pin: ${uart_tx_pin}
  input_obst_pin: ${input_obst_pin}
  #tof_sda_pin: ${tof_sda_pin}  # uncomment with ToF Sensor
  #tof_scl_pin: ${tof_scl_pin}  # uncomment with ToF Sensor
  protocol: secplusv2           # one of secplusv2, secplusv1 or drycontact

sensor:
  - platform: ratgdo
    id: ${id_prefix}_openings
    type: openings
    entity_category: diagnostic
    ratgdo_id: ${id_prefix}
    name: "Openings"
    unit_of_measurement: "openings"
    icon: mdi:open-in-app
  - platform: wifi_signal # Reports the WiFi signal strength/RSSI in dB
    id: wifi_signal_db
    update_interval: 30s
    entity_category: "diagnostic"
  - platform: copy # Reports the WiFi signal strength in %
    source_id: wifi_signal_db
    name: "WiFi Signal Strength"
    filters:
      - lambda: return min(max(2 * (x + 100.0), 0.0), 100.0);
    unit_of_measurement: "%"
    entity_category: "diagnostic"
    device_class: ""

# Optional Add-on ToF Sensor
#  - platform: ratgdo
#    id: ${id_prefix}_vehicle_distance_actual
#    type: distance
#    name: "Vehicle Distance Measured"
#    ratgdo_id: ${id_prefix}
#    unit_of_measurement: "mm"
#    internal: true
#    filters:
#      - throttle: 500ms
#      - heartbeat: 1s

#  - platform: copy
#    source_id: ${id_prefix}_vehicle_distance_actual
#    name: Vehicle Distance Measure Filtered
#    filters:
#      - min:
#          window_size: 6   # increase window if the reading varies to much
#          send_every: 1
#      - quantile:           # remove outliers that are not in the 90th percentile
#          window_size: 12
#          send_every: 1
#          quantile: .9     # Useful for surfaces that scatter the signal and other issues

# Optional Add-on DHT22
#  - platform: dht
#    model: DHT22
#    pin: GPIO26 # v1 board=GPIO3, v2 board=GPIO26, v2.5 (2nd Aux) board = GPIO27
#    temperature:
#      name: "Temperature"
#      accuracy_decimals: 1
#      filters:                                  # °F vs default °C
#       - lambda: return x * (9.0/5.0) + 32.0;
#      unit_of_measurement: "°F"
#    humidity:
#      name: "Humidity"
#      accuracy_decimals: 1
#    update_interval: 60s

# AHT20 Temp and Humidity option
#  - platform: aht10
#    address: 0x38
#    variant: AHT20
#    temperature:
#      id: id_temperature_sensor
#      name: "AHT20 Temperature"
#    humidity:
#      id: id_humidity_sensor
#      name: "AHT20 Humidity"
#    update_interval: 10s

# Optional Add-on ENS160/AHT20
#  - platform: aht10
#    address: 0x38
#    variant: AHT20
#    temperature:
#      id: id_temperature_sensor
#      name: "AHT20 Temperature"
#    humidity:
#      id: id_humidity_sensor
#      name: "AHT20 Humidity"
#    update_interval: 60s
#  - platform: ens160_i2c
#    address: 0x53
#    eco2:
#      name: "ENS160 eCO2"
#    tvoc:
#      name: "ENS160 TVOC"
#    aqi:
#      name: "ENS160 AQI"
#    compensation:
#      temperature: id_temperature_sensor
#      humidity: id_humidity_sensor
#    update_interval: 90s

# GRAIRQ1 and GRTH1 sensors requires i2c
#i2c:
#  sda: ${i2c_sda_pin}
#  scl: ${i2c_scl_pin}
#  id: bus_a
#  frequency: 100kHz
#  scan: False

binary_sensor:
  - platform: ratgdo
    type: motion
    id: ${id_prefix}_motion
    ratgdo_id: ${id_prefix}
    name: "Motion"
    device_class: motion

  - platform: ratgdo
    type: obstruction
    id: ${id_prefix}_obstruction
    ratgdo_id: ${id_prefix}
    name: "Obstruction"
    device_class: problem

  - platform: ratgdo
    type: button
    id: ${id_prefix}_button
    ratgdo_id: ${id_prefix}
    name: "Button"
    entity_category: diagnostic

  - platform: ratgdo
    type: motor
    id: ${id_prefix}_motor
    ratgdo_id: ${id_prefix}
    name: "Motor"
    device_class: running
    entity_category: diagnostic

# Optional Add-on ToF Sensor
#  - platform: ratgdo
#    ratgdo_id: ${id_prefix}
#    id: ${id_prefix}_vehicle_detected
#    type: vehicle_detected
#    name: "Vehicle State Detected"

#  - platform: ratgdo
#    ratgdo_id: ${id_prefix}
#    id: ${id_prefix}_vehicle_arriving
#    type: vehicle_arriving
#    name: "Vehicle State Arriving"

#  - platform: ratgdo
#    ratgdo_id: ${id_prefix}
#    id: ${id_prefix}_vehicle_leaving
#    type: vehicle_leaving
#    name: "Vehicle State Leaving"

  - platform: gpio
    id: "${id_prefix}_dry_contact_open"
    pin:
      number: ${dry_contact_open_pin}  #  dry contact for opening door
      inverted: true
      mode:
        input: true
        pullup: true
    name: "Dry contact open"
    entity_category: diagnostic
    on_press:
      - if:
          condition:
            binary_sensor.is_off: ${id_prefix}_dry_contact_close
          then:
            - cover.open: ${id_prefix}_garage_door
  - platform: gpio
    id: "${id_prefix}_dry_contact_close"
    pin:
      number: ${dry_contact_close_pin}  # dry contact for closing door
      inverted: true
      mode:
        input: true
        pullup: true
    name: "Dry contact close"
    entity_category: diagnostic
    on_press:
      - if:
          condition:
            binary_sensor.is_off: ${id_prefix}_dry_contact_open
          then:
            - cover.close: ${id_prefix}_garage_door
  - platform: gpio
    id: "${id_prefix}_dry_contact_light"
    pin:
      number: ${dry_contact_light_pin}  # dry contact for triggering light
      inverted: true
      mode:
        input: true
        pullup: true
    name: "Dry contact light"
    entity_category: diagnostic
    on_press:
      - light.toggle: ${id_prefix}_light

number:
  - platform: ratgdo
    id: ${id_prefix}_rolling_code_counter
    type: rolling_code_counter
    entity_category: config
    ratgdo_id: ${id_prefix}
    name: "Rolling code counter"
    mode: box
    unit_of_measurement: "codes"

  - platform: ratgdo
    id: ${id_prefix}_opening_duration
    type: opening_duration
    entity_category: config
    ratgdo_id: ${id_prefix}
    name: "Opening duration"
    unit_of_measurement: "s"

  - platform: ratgdo
    id: ${id_prefix}_closing_duration
    type: closing_duration
    entity_category: config
    ratgdo_id: ${id_prefix}
    name: "Closing duration"
    unit_of_measurement: "s"

  - platform: ratgdo
    id: ${id_prefix}_client_id
    type: client_id
    entity_category: config
    ratgdo_id: ${id_prefix}
    name: "Client ID"
    mode: box
# Time To Close (TTC) is only availble on the v1.2.0 GR git repo release
  - platform: ratgdo
    id: ${id_prefix}_time_to_close
    type: time_to_close
    entity_category: config
    ratgdo_id: ${id_prefix}
    name: "Time to close"
    mode: box
    unit_of_measurement: "s"

# Close notification is only availble on the v1.2.0 GR git repo release
switch:
  - platform: ratgdo
    id: ${id_prefix}_close_notification
    type: close_notification
    ratgdo_id: ${id_prefix}
    name: "Close Notification"
    restore_mode: RESTORE_DEFAULT_OFF
    icon: "mdi:bell-alert"

# Toggle only mode - for Opener firmware versions that only use toggle to close the door
# Common on EU models
# - platform: ratgdo
#   id: ${id_prefix}_toggle_only_mode
#   type: toggle_only
#   ratgdo_id: ${id_prefix}
#   name: "Toggle Only Mode"
#   icon: "mdi:toggle-switch"

# Invert obstruction is only availble on the v1.2.0 GR git repo release
# Solves issues with some one off GDO implemenations etc.
#  - platform: ratgdo
#    id: ${id_prefix}_invert_obstruction
#    type: invert_obstruction
#    ratgdo_id: ${id_prefix}
#    name: "Invert Obstruction"

# Optional Add-on ToF Sensor
#  - platform: ratgdo
#    id: ${id_prefix}_target_distance_measurement
#    type: target_distance_measurement
#    entity_category: config
#    ratgdo_id: ${id_prefix}
#    name: "Vehicle Target Distance"
#    mode: box
#    unit_of_measurement: "mm"

cover:
  - platform: ratgdo
    id: ${id_prefix}_garage_door
    device_class: garage
    name: "Door"
    ratgdo_id: ${id_prefix}

light:
  - platform: ratgdo
    id: ${id_prefix}_light
    name: "Light"
    ratgdo_id: ${id_prefix}

lock:
  - platform: ratgdo
    id: ${id_prefix}_lock_remotes
    name: "Lock remotes"
    ratgdo_id: ${id_prefix}

button:
  - platform: restart
    name: "Restart"
  - platform: safe_mode
    name: "Safe mode boot"
    entity_category: diagnostic

  - platform: template
    id: ${id_prefix}_query_status
    entity_category: diagnostic
    name: "Query status"
    on_press:
      then:
        lambda: !lambda |-
          id($id_prefix).query_status();

  - platform: template
    id: ${id_prefix}_query_openings
    name: "Query openings"
    entity_category: diagnostic
    on_press:
      then:
        lambda: !lambda |-
          id($id_prefix).query_openings();

  - platform: template
    id: ${id_prefix}_sync
    name: "Sync"
    entity_category: diagnostic
    on_press:
      then:
        lambda: !lambda |-
          id($id_prefix).sync();

  - platform: template
    id: ${id_prefix}_toggle_door
    name: "Toggle door"
    on_press:
      then:
        lambda: !lambda |-
          id($id_prefix).door_toggle();

status_led:
pin: GPIO4GDO Setup Guide – Captive Portal Method
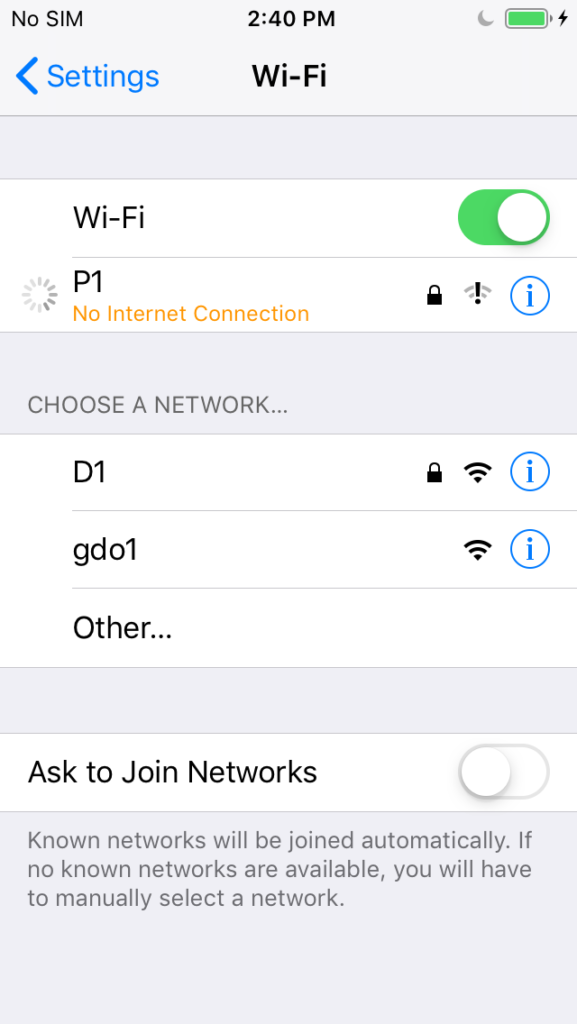
With the GRGDO1 already powered up for about 1 minute use a phone or other capable device connect to the GRGDO1 default preinstalled captive portal AP SSID named gdo1 or similar. Some versions of ESPHome do not auto redirect to the portal. Use http://192.168.4.1 on the device you connected with in those cases.
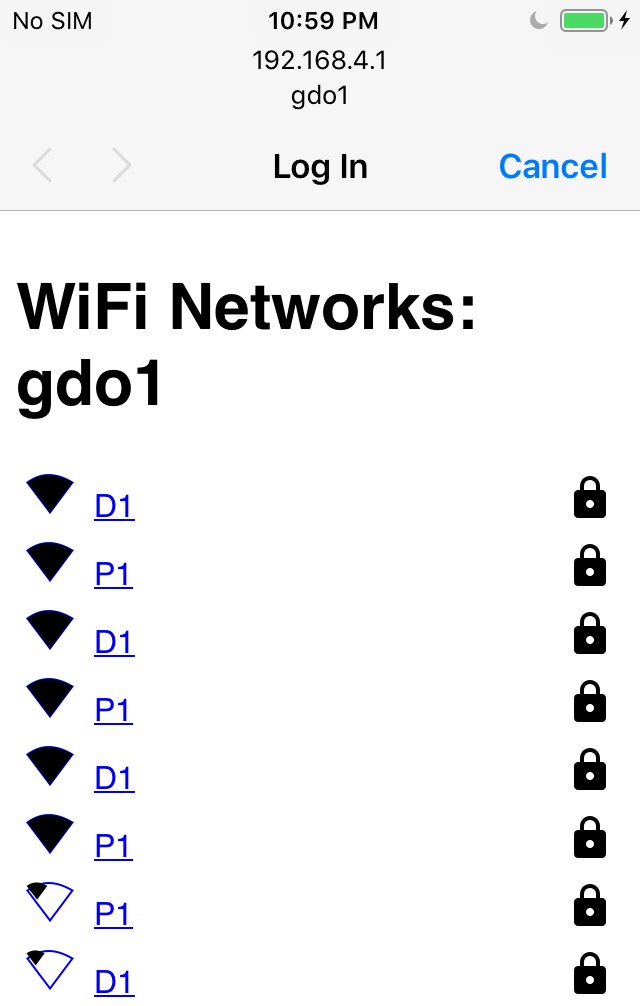
Select the desired SSID and set your Password .
Note: Again depending on the version of ESPHome you may need to manually open a browser to reach the captive portal.
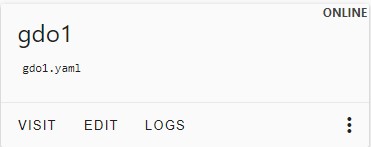
After a minute or so visit the GRGDO1 WEB portal using its mDNS address to verify it’s ready. Power cycle it if required.
http://gdo1.local
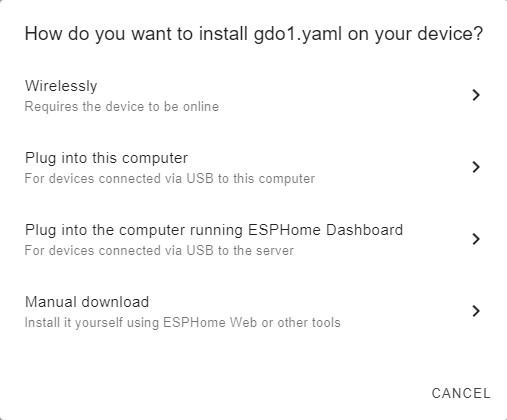
Prepare the firmware by selecting INSTALL on the top right of the ESPHome edit screen.

We need to select manual download since the the factory setting will not have an OTA password set, as a result we use the WEB UI to update the firmware with the registered device firmware build.
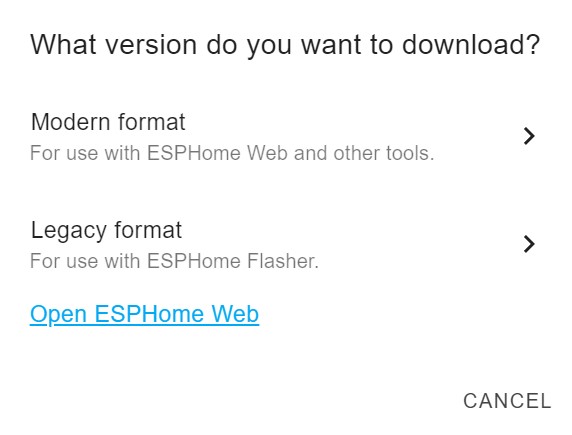
Be sure to generate the Legacy format and then proceed to selecting the file for the OTA upload.

We can now use the factory set WEB UI to upload the newly created firmware named gdo1.bin which is based on the device name.
GRGDO1 will now come online and you can add it to Home Assistant with the configured API encryption key.
GDO Setup Guide – Physical USB Serial Method (v1 board only)
To enable flash mode on the GRGDO1 v1 board you need to depress and hold SW1 then connect your USB to serial adapter to the UART flashing connector as shown here. Once power is applied the button can be released and GRGDO1 will be in flash mode. (Pre-connecting J1 and then plugging in the USB end is usually easier)
Note: Many USB to UART adapters cannot supply enough current to run the ESP32S with WiFi enabled, you may experience brown out reboots after flashing. Connect to AC to validate your good to go.
Serial TX and RX pins should be crossed e.g.
J1 GRGDO1 V1 : USB Adapter
1  TX        ->    RX
2  RX        <-    TX
3  3.3v      -    3.5v Max
4  GND       -    GND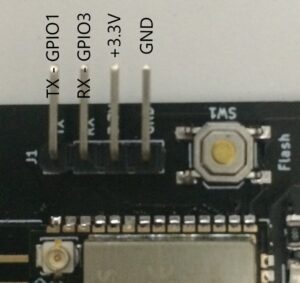
For v2 boards simply plug in to the USB port and install from HA or ESPHome’s command line.
Prepare the firmware by selecting install on the top right of the ESPHome edit screen.
Select Plug into this computer.
GRGDO1 will now come online and you can add it to Home Assistant with the configured key.
MQTT option
You have the option to run the GRGDO1 with MQTT. MQTT can be used for Home Assistant and a variety of other home automation systems such as HomeKit. Configuring and flashing the GRGDO1 would require compiling ESPHome using a docker environment in either a Home Assistant ESPHome integration or a standalone instance which is not detailed here and can be setup referencing this documentation https://esphome.io/guides/getting_started_command_line.html
An MQTT implementation method grants access to the full of ESPHome RATGDO component features. This is a significant enhancement over using a RATGDO MQTT or Native RATGDO HomeKit firmware images.
Enabling MQTT requires that a Home Assistant API is disabled, comment out the following api entry as show.
# Enable Home Assistant API
# api:
#   encryption:
# key: "<your key>"This minimum set of MQTT YAML entries must be added to your YAML config. Notice the improv_serial: entry, this is optional and is handy for setting or changing WiFi SSID and password up serially using a USB UART adapter. You will also be able to open any web server that is enabled for it via ESP WEB Tools.
We have included this example YAML, if you need more options see the full set at https://esphome.io/components/mqtt.html
improv_serial:

mqtt:
  id: mqtt_client
  client_id: GRGDO1
  broker: <mqtt_ip>
  username: <mqtt_username>
  password: <mqtt_password>
  discover_prefix: <your systems prefix> # Defauts to homeassistant
  birth_message:
    topic: availability
    payload: online
  will_message:
    topic: availability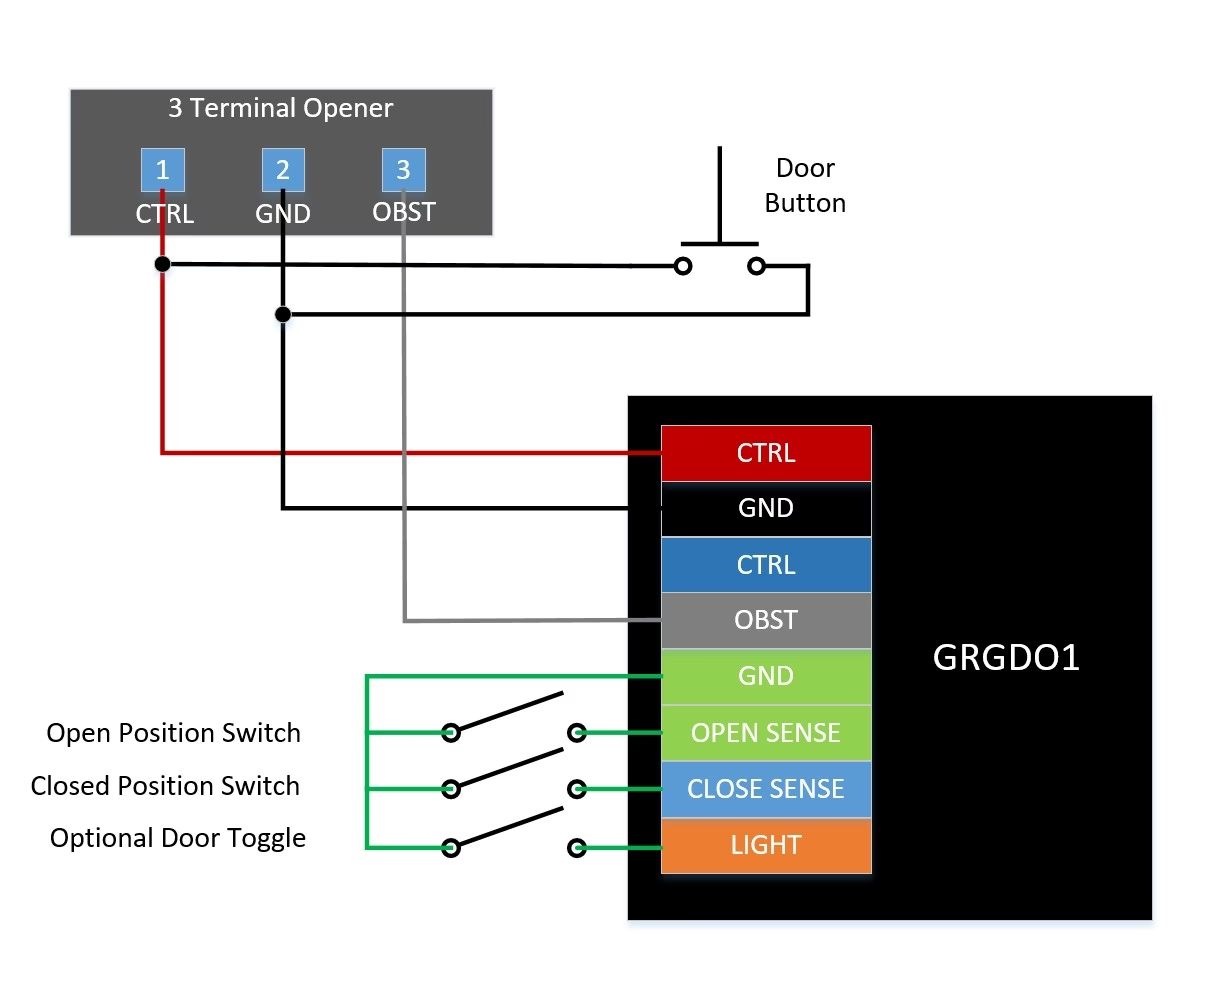
payload: offlineConnecting the GRGDO1 Module
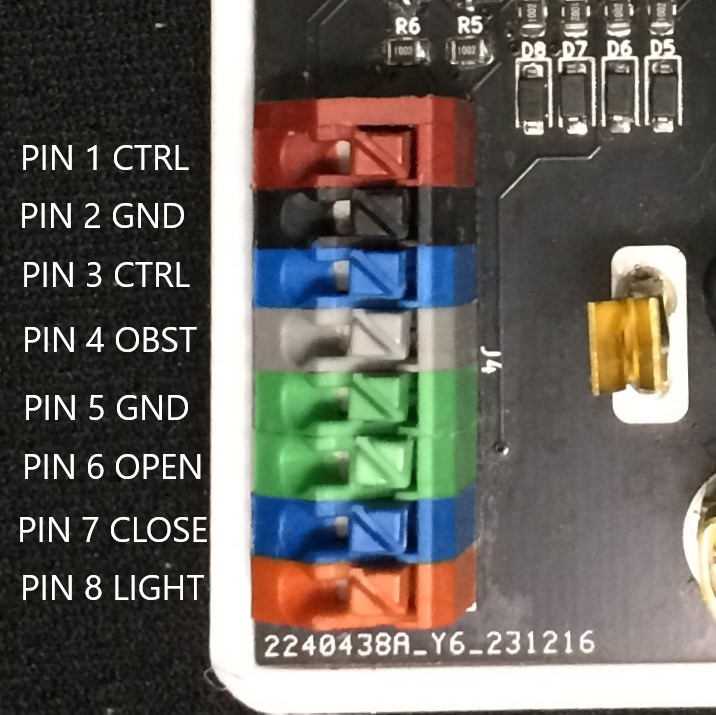
J4 Pinouts v1 or v2 boards
Pins 1 or 3 (CTRL) connects to the RED door opener terminal, this is the wired rolling code control signal. It can also connect to the door control button panel. Two terminals are provided to allow for a secondary feed.
Pins 2 or 5 (GND) connect to one of the WHITE door opener terminals, this is the system GND. Two terminals are provided to allow for a secondary feed.
Pins 6,7 and 8 are the dry contact inputs. This is the default config from the YAML file. These inputs can be used for other purposes such as a door status switch. They are voltage clamped to protect the ESP inputs from over voltages.
Example Wired Connection
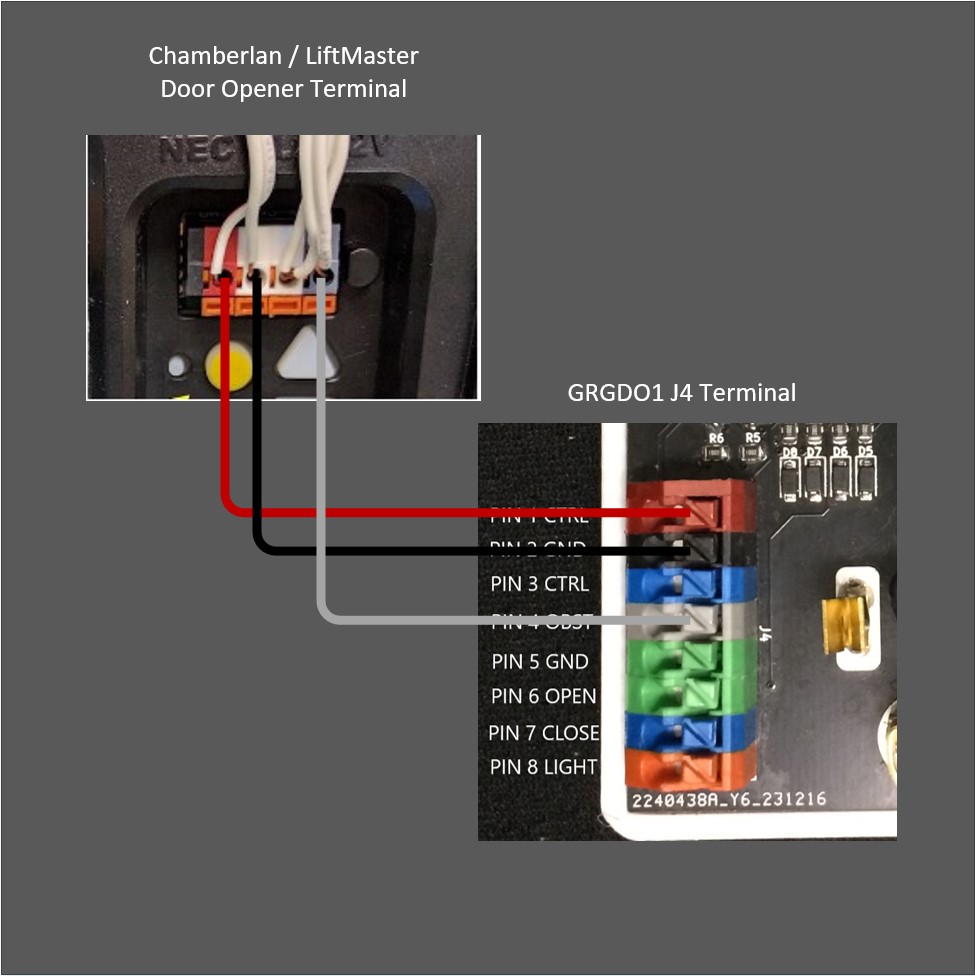
This example is a basic config and is the most common way to connect up the GRGDO1 hardware
Connecting an optional DHT22
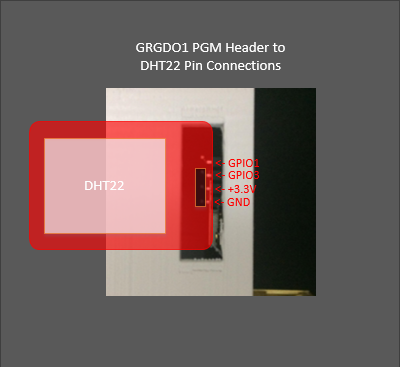
The DHT22 should align as shown
v2 boards are the same positions except the pins are GPIO26 replacing GPIO3 and GPIO25 replaces GPIO1 as shown below

Home Assistant Dashboard Examples
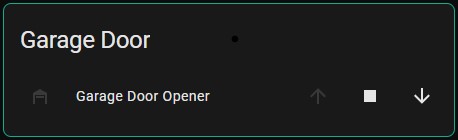
Button Card
Our GDO setup guide includes this custom button card which provides a compact simple interface for quick ops on a phone. This example assumes you have a HACS frontend installed with button-card and card-mod setup. If you’re not familiar with HACS it’s a community based HA integration have a look at https://www.hacs.xyz/docs/use/configuration/basic/
If you plan to use this custom button card, be sure to create the templates on your dashboard to use this example. You can find them on the dashboard … menu the select the raw editor. This YAML hosts button_card_templates for blank-button-card, light-button-card, plug-button-card and the one you need for this example garage-door-button-card.
title: YourDashBoard
button_card_templates:
  blank-button-card:
    icon: mdi:switch
    size: 40px
    show_icon: false
    styles:
      card:
        - aspect_ratio: 1/1
        - padding: 5px 5px
        - border-radius: 2
        - color: var(--background-color)
  light-button-card:
    icon: mdi:lightbulb
    size: 40px
    hold_action:
      action: more-info
    styles:
      card:
        - aspect_ratio: 1/1
        - padding: 5px 5px
        - border-radius: 2
        - border-color: var(--primary-color)
  plug-button-card:
    icon: mdi:power-plug
    size: 40px
    hold_action:
      action: more-info
    styles:
      card:
        - aspect_ratio: 1/1
        - padding: 5px 5px
        - border-radius: 2
        - border-color: var(--primary-color)
  garage-door-button-card:
    variables:
      - icon_on: ''
      - icon_off: ''
      - icon_locked: ''
    icon: |
      [[[ if (entity.state == "open") return variables.icon_open;
          if (entity.state == "closed") return variables.icon_closed;
           else return variables.icon_cached;
      ]]]
    size: 40px
    action: toggle
    hold_action:
      action: more-info
    styles:
      card:
        - aspect_ratio: 1/1
        - padding: 5px 5px
        - border-radius: 2
        - border-color: var(--primary-color)
      icon:
        - color: |
            [[[ if (entity.state == "closed") return 'var(--state-icon-color)' ;
                else return 'var(--state-icon-active-color)';
            ]]]
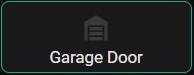
Compact Button Card – Closed State
Compact Button Card – Transition State
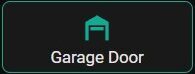
Compact Button Card – Open State
# HA Button Card YAML Example

# Button part
type: custom:button-card
template: garage-door-button-card
entity: cover.gdo1_door # Note: SecplusGDO will be cover.grgdo1_door (based on name)
name: Garage Door
tap_action:
  action: toggle
variables:
  icon_open: mdi:garage-open
  icon_closed: mdi:garage
  icon_cached: mdi:cached

# Add this seaparately in your Dashboard raw editor
# You could also create a YAML file and include it from the configuration.yaml file
# Template part
garage-door-button-card:
  variables:
    - icon_on: ''
    - icon_off: ''
    - icon_locked: ''
  icon: |
    [[[ if (entity.state == "open") return variables.icon_open;
        if (entity.state == "closed") return variables.icon_closed;
         else return variables.icon_cached;
    ]]]
  size: 40px
  action: toggle
  hold_action:
    action: more-info
  styles:
    card:
      - aspect_ratio: 1/1
      - padding: 5px 5px
      - border-radius: 2
      - border-color: var(--primary-color)
    icon:
      - color: |
          [[[ if (entity.state == "closed") return 'var(--state-icon-color)' ;
              else return 'var(--state-icon-active-color)';
]]] Entity Card
In this GDO setup guide example we use the default entity card with a custom card-mod to high light it’s border, in this case the custom card-mod is optional.
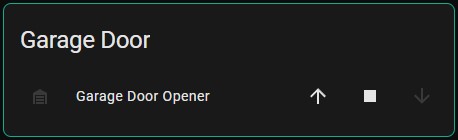
Entity Card – Closed
Entity Card – Transition
Entity Card – Open
# Entities example
type: entities
entities:
  - entity: cover.gdo1_door
    name: Garage Door Opener
title: Garage Door
card_mod:
  style: |
    ha-card {
      border-color: var(--primary-color);
}Dry Contact Setups
Dry contact GDO’s can be operated with the GRGDO1. You will need to setup limit switches for open and close state updates. Two magnets and two reeds are recommended along the drive rail to signal the closed and open position. Same type that are used for alarm systems are fine. They have variable trigger range you keep that in mind when choosing them based on the distances you’re working with. The open and close time calculations are based on the switches. Use the following YAML to configure the dry contact protocol.
# GDO setup guide ver 2025.09.23
# The VL53L1X ToF Sensor on RATGDO firmmare requires the GelidusResearch Repo
external_components:
  - source:
      type: git
      url: https://github.com/gelidusresearch/esphome-ratgdo.git
      ref: 1.3.1
    components: [ ratgdo ]
    refresh: 0s

substitutions:
  id_prefix: ratgdo1
  friendly_name: "GDO1"
  uart_tx_pin: GPIO22           # J4 Pin 1 or 3 Red CTRL
  uart_rx_pin: GPIO21           # J4 Pin 1 or 3 Red CTRL
  input_obst_pin: GPIO23        # J4 Pin 4 Grey OBST
  dry_contact_open_pin: GPIO18  # J4 Pin 6 Green
  dry_contact_close_pin: GPIO19 # J4 Pin 7 Blue
  dry_contact_light_pin: GPIO17 # J4 Pin 8 Orange
  tof_sda_pin: GPIO26           # Aux port pin 2 use GPIO3 on v1 boards
  tof_scl_pin: GPIO25           # Aux port pin 1 use GPIO1 on v1 boards
  i2c_sda_pin: GPIO25           # GPIO25 = v2 board, GPIO1 = v1 board
  i2c_scl_pin: GPIO26           # GPIO26 = v2 board, GPIO3 = v1 board

esphome:
  name: gdo1
  friendly_name: gdo1

esp32:
  board: esp32dev
  framework:
    type: arduino

# Enable logging
logger:
  baud_rate: 921600 #0 # Disable logging when running a ToF or DHT sensor on a v1 board otherwise set to 921600 (faster logging improves response time)


# Enable Home Assistant API
api:
  encryption:
    key: "<your key>"  #Preserve this entry

ota:
  - platform: esphome # post 2024.5.x
    password: "<your password>"  # recommened but can be ommited for testing
#  - platform: web_server         # File based web ui upload - factory image default

wifi:
  ssid: !secret wifi_ssid
  password: !secret wifi_password

  ap:
    ssid: "gdo1"
    password: ""

captive_portal:

web_server:
  port: 80
  version: 3
#  username: !secret web_user      #  recommended, enable for minimal security
#  password: !secret web_password  # needs secrets file entries creatde first

safe_mode:

preferences:
  flash_write_interval: 15min

ratgdo:
  id: ${id_prefix}
  input_gdo_pin: ${uart_rx_pin}
  output_gdo_pin: ${uart_tx_pin}
  input_obst_pin: ${input_obst_pin}
  dry_contact_open_sensor: ${id_prefix}_dry_contact_open
  dry_contact_close_sensor: ${id_prefix}_dry_contact_close
  discrete_open_pin: GPIO33 #Dummy pin prevents code exceptions, unchecked in cg
  discrete_close_pin: GPIO32 #Dummy pin prevents code exceptions, unchecked in cg
  #tof_sda_pin: ${tof_sda_pin}  # uncomment with ToF Sensor
  #tof_scl_pin: ${tof_scl_pin}  # uncomment with ToF Sensor
  protocol: drycontact

# Optional Add-on ToF Sensor
#  - platform: ratgdo
#    id: ${id_prefix}_vehicle_distance_actual
#    type: distance
#    name: "Vehicle Distance Measured"
#    ratgdo_id: ${id_prefix}
#    unit_of_measurement: "mm"
#    internal: true
#    filters:
#      - throttle: 500ms
#      - heartbeat: 1s

#  - platform: copy
#    source_id: ${id_prefix}_vehicle_distance_actual
#    name: Vehicle Distance Measure Filtered
#    filters:
#      - min:
#          window_size: 6   # increase window if the reading varies to much
#          send_every: 1
#      - quantile:          # remove outliers that are not in the 90th percentile
#          window_size: 12
#          send_every: 1
#          quantile: .9     # Useful for surfaces that scatter the signal and other issues

# Optional Add-on DHT22
#  - platform: dht
#    model: DHT22
#    pin: GPIO3 # v1 board=GPIO3, v2 board=GPIO26
#    temperature:
#      name: "Temperature"
#      accuracy_decimals: 1
#      filters:                                  # °F vs default °C
#       - lambda: return x * (9.0/5.0) + 32.0;
#      unit_of_measurement: "°F"
#    humidity:
#      name: "Humidity"
#      accuracy_decimals: 1
#    update_interval: 60s

# AHT20 Temp and Humidity option
#  - platform: aht10
#    address: 0x38
#    variant: AHT20
#    temperature:
#      id: id_temperature_sensor
#      name: "AHT20 Temperature"
#    humidity:
#      id: id_humidity_sensor
#      name: "AHT20 Humidity"
#    update_interval: 10s

# Optional Add-on ENS160/AHT20
#  - platform: aht10
#    address: 0x38
#    variant: AHT20
#    temperature:
#      id: id_temperature_sensor
#      name: "AHT20 Temperature"
#    humidity:
#      id: id_humidity_sensor
#      name: "AHT20 Humidity"
#    update_interval: 60s
#  - platform: ens160_i2c
#    address: 0x53
#    eco2:
#      name: "ENS160 eCO2"
#    tvoc:
#      name: "ENS160 TVOC"
#    aqi:
#      name: "ENS160 AQI"
#    compensation:
#      temperature: id_temperature_sensor
#      humidity: id_humidity_sensor
#    update_interval: 90s

# GRAIRQ1 and GRTH1 sensors requires i2c
#i2c:
#  sda: ${i2c_sda_pin}
#  scl: ${i2c_scl_pin}
#  id: bus_a
#  frequency: 100kHz
#  scan: False

binary_sensor:
  - platform: ratgdo
    type: obstruction
    id: ${id_prefix}_obstruction
    ratgdo_id: ${id_prefix}
    name: "Obstruction"
    device_class: problem
  - platform: gpio
    id: "${id_prefix}_dry_contact_open"
    pin:
      number: ${dry_contact_open_pin}
      inverted: true
      mode:
        input: true
        pullup: true
    name: "Open limit switch"
    entity_category: diagnostic
    filters:
      - delayed_on_off: 500ms
  - platform: gpio
    id: "${id_prefix}_dry_contact_close"
    pin:
      number: ${dry_contact_close_pin}
      inverted: true
      mode:
        input: true
        pullup: true
    name: "Close limit switch"
    entity_category: diagnostic
    filters:
      - delayed_on_off: 500ms
  - platform: gpio
    id: "${id_prefix}_dry_contact_light"
    pin:
      number: ${dry_contact_light_pin}
      inverted: true
      mode:
        input: true
        pullup: true
    name: "Door Toggle"
    entity_category: diagnostic
    on_press:
      then:
        lambda: !lambda |-
          id($id_prefix).door_toggle();

# Optional Add-on ToF Sensor
#  - platform: ratgdo
#    ratgdo_id: ${id_prefix}
#    id: ${id_prefix}_vehicle_detected
#    type: vehicle_detected
#    name: "Vehicle State Detected"

#  - platform: ratgdo
#    ratgdo_id: ${id_prefix}
#    id: ${id_prefix}_vehicle_arriving
#    type: vehicle_arriving
#    name: "Vehicle State Arriving"

#  - platform: ratgdo
#    ratgdo_id: ${id_prefix}
#    id: ${id_prefix}_vehicle_leaving
#    type: vehicle_leaving
#    name: "Vehicle State Leaving"

number:
  - platform: ratgdo
    id: ${id_prefix}_opening_duration
    type: opening_duration
    entity_category: config
    ratgdo_id: ${id_prefix}
    name: "Opening duration"
    unit_of_measurement: "s"

  - platform: ratgdo
    id: ${id_prefix}_closing_duration
    type: closing_duration
    entity_category: config
    ratgdo_id: ${id_prefix}
    name: "Closing duration"
    unit_of_measurement: "s"

#Optional Add-on ToF Sensor
#  - platform: ratgdo
#    id: ${id_prefix}_target_distance_measurement
#    type: target_distance_measurement
#    entity_category: config
#    ratgdo_id: ${id_prefix}
#    name: "Vehicle Distance Target"
#    mode: box
#    unit_of_measurement: "mm"

cover:
  - platform: ratgdo
    id: ${id_prefix}_garage_door
    device_class: garage
    name: "Door"
    ratgdo_id: ${id_prefix}

button:
  - platform: restart
    id: ${id_prefix}_restart
    name: "Restart"
  - platform: safe_mode
    id: ${id_prefix}_safe_mode
    name: "Safe mode boot"
    entity_category: diagnostic

  - platform: template
    id: ${id_prefix}_toggle_door
    name: "Toggle door"
    on_press:
      then:
        lambda: !lambda |-
          id($id_prefix).door_toggle();

status_led: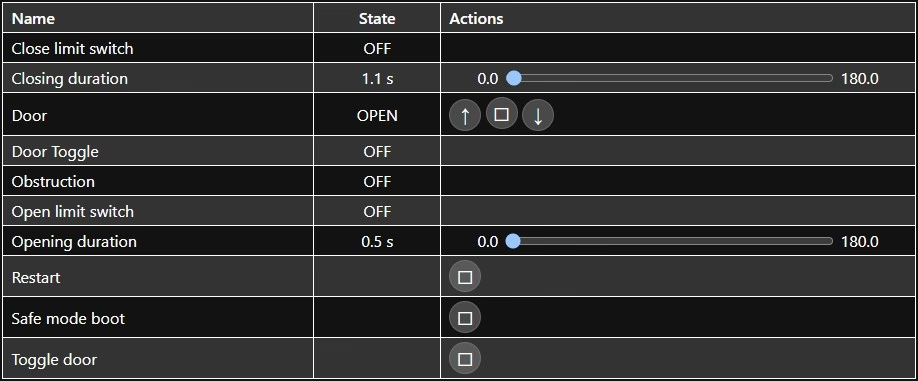
pin: GPIO4The required wiring is as follows:
Dry contact will have minimal controls as show here.
This completes the GDO Setup Guide. For addition help please join the ESPhome discord site and ping @descipher