This LD2420 or LD2410C (PS1 ) setup guide provides two methods to add the PS1 to an ESPHome/Home Assistant instance. You can add a new device and flash the firmware with a physical device connection via USB serial or you can add it using the pre installed PS1 WIFI Captive portal and upload the firmware via OTA. Using the WIFI Captive portal method is by far a more convenient method since we only need a cell phone to establish your local WIFI connection. If the method chosen is the captive portal then you can install PS1 physically and proceed to configure it remotely using your phone and ESPHome/Home Assistant after approximately one minute of power on time.
Important information:
- NEVER connect to a live AC supply while the case is open.
- Flashing the ESP must be done with a 3.3v supply and not when connected to your AC supply.
- Always use an non-metallic fire safe enclosure to house the PS1 , (Optionally oderable with the PS1 )
- The ESPhome Home Assistant Add-on is required – see: https://esphome.io/guides/getting_started_hassio.html
ESPHome Device Preparation
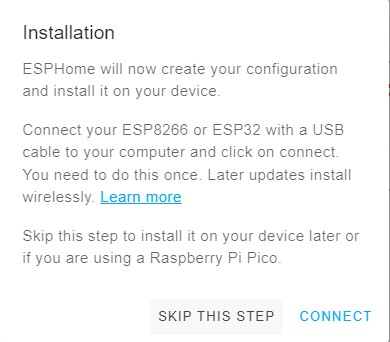
Since we are appending to the YAML config we can skip this step. We need to add a full configuration from the content in this guide.
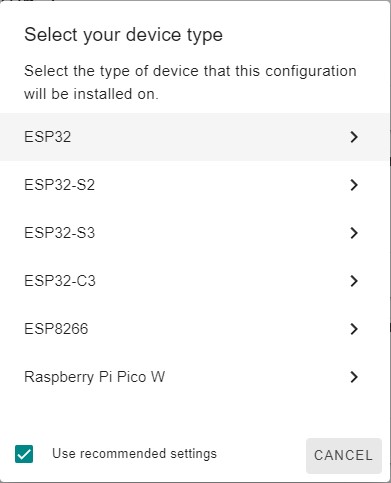
The PS1 is powered with an ESP32 as shown so we need to set it likewise.
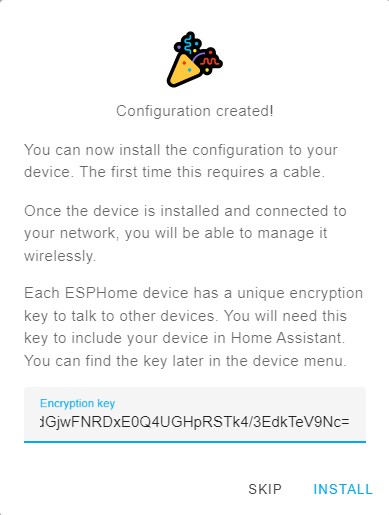
Skip this step and note the generated unique key, this must be preserved in the config going forward.
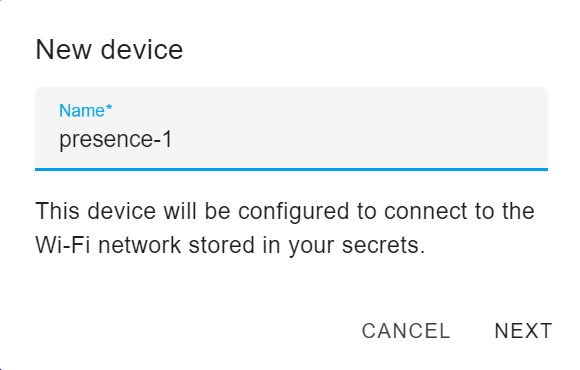
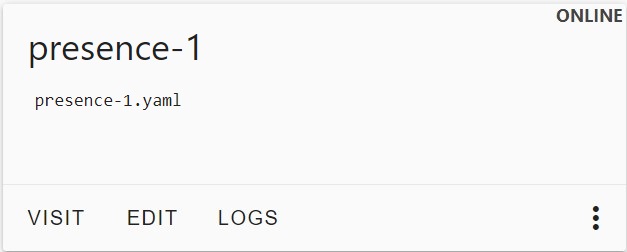
Now we can edit the newly created device named presence-1 preserving the API key, add the example PS1 code after the captive portal line, as shown.
Example LD2420 YAML Configuration
For additional ESPhome documentation see: https://esphome.io/components/sensor/ld2420
# Version 2026.01.06
esphome:
  name: presence-1
  friendly_name: presence-1

esp32:
  board: esp32dev
  framework:
    type: arduino

# Enable logging
# Use higher baud rates to avoid long running delay warns
# e.g. 230400, 256000, 460800, 921600
logger:
  baud_rate: 921600

# Enable Home Assistant API
api:
  encryption:
    key: "<your_key>"

ota:
  - platform: esphome # post 2024.5.x
    password: "<your password>"  # recommened but can be ommited for testing
#  - platform: web_server         # File based web ui upload - factory image default

wifi:
  power_save_mode: none
  ssid: !secret wifi_ssid          # Check the secrets file for the correct values
  password: !secret wifi_password  # Ditto
  # Enable fallback hotspot (captive portal) in case wifi connection fails
  ap:
    ssid: "presence-1"
    password: !secret captive_password
    ap_timeout: 10s

captive_portal:

web_server:
  port: 80
  version: 3
#  username: !secret web_user      # enable for minimal security
#  password: !secret web_password  # needs secrets file entries created first

web_server:
  username: !secret web_user
  password: !secret web_password

uart:
  id: ld2420_uart
  tx_pin: GPIO17
  rx_pin: GPIO16
  baud_rate: 115200
  parity: NONE
  stop_bits: 1

# The LD2420 has 16 sense gates 0-15 and each gate detects 0.7 meters 15th gate = 9m
ld2420:

# Uncommnet for night light model
#output:
#  - platform: ledc
#    id: pwm_output
#    pin: GPIO25
#    frequency: 500 Hz  # You can adjust the frequency if needed
#    inverted: false     # Set to true if you want inverted PWM signal

#light:
#  - platform: monochromatic
#    name: "PWM Light"
#    output: pwm_output
#    restore_mode: ALWAYS_OFF

text_sensor:
  - platform: ld2420
    fw_version:
      name: LD2420 Firmware

sensor:
  - platform: ld2420
    moving_distance:
      name : Moving Distance
  - platform: wifi_signal # Reports the WiFi signal strength/RSSI in dB
    id: wifi_signal_db
    update_interval: 60s
    entity_category: "diagnostic"
  - platform: copy # Reports the WiFi signal strength in %
    source_id: wifi_signal_db
    name: "WiFi Signal Strength"
    filters:
      - lambda: return min(max(2 * (x + 100.0), 0.0), 100.0);
    unit_of_measurement: "%"
    entity_category: "diagnostic"
    device_class: ""

binary_sensor:
  - platform: ld2420
    has_target:
      name: Presence

  # Optional use of te GPIO binary output to enable/disable HA detection states
  - platform: gpio
    pin: GPIO4
    name: GPIO Presence
    id: gpio_presence_sensor
  - platform: template
    name: presence_state
    lambda: |-
      if (id(enable_presence_sensor).state && id(gpio_presence_sensor).state) {
        return true;
      } else {
        return false;
      }

switch:
  - platform: restart
    name: Restart ESPHome Node

  # Enables/disables presence_state entity output
  - platform: template
    name: "Enable Presence Sensor"
    id: enable_presence_sensor
    restore_mode: RESTORE_DEFAULT_ON
    optimistic: True

select:
  - platform: ld2420
    operating_mode:
      name: Operating Mode

number:
  - platform: ld2420
    presence_timeout:
      name: Detection Presence Timeout
    min_gate_distance:
      name: Detection Gate Minimum
    max_gate_distance:
      name: Detection Gate Maximum
    gate_select:
      name: Select Gate to Set
    still_threshold:
      name: Set Still Threshold Value
    move_threshold:
      name: Set Move Threshold Value
    gate_move_sensitivity:
      name: Calibration Move Sensitivity Factor
    gate_still_sensitivity:
      name: Calibration Still Sensitivity Factor

# When gate select is defined the individual gate_n: threshold optionals are ignored.
# This mode offers a compressed UI.
# With gate_select still and move_threshold are required.

#    gate_select:
#      name: Select Gate to Set
#    still_threshold:
#      name: Set Still Threshold Value
#    move_threshold:
#      name: Set Move Threshold Value

    gate_0:
      move_threshold:
        name: Gate 0 Move Threshold
      still_threshold:
        name: Gate 0 Still Threshold
    gate_1:
      move_threshold:
        name: Gate 1 Move Threshold
      still_threshold:
        name: Gate 1 Still Threshold
    gate_2:
      move_threshold:
        name: Gate 2 Move Threshold
      still_threshold:
        name: Gate 2 Still Threshold
    gate_3:
      move_threshold:
        name: Gate 3 Move Threshold
      still_threshold:
        name: Gate 3 Still Threshold
    gate_4:
      move_threshold:
        name: Gate 4 Move Threshold
      still_threshold:
        name: Gate 4 Still Threshold
    gate_5:
      move_threshold:
        name: Gate 5 Move Threshold
      still_threshold:
        name: Gate 5 Still Threshold
    gate_6:
      move_threshold:
        name: Gate 6 Move Threshold
      still_threshold:
        name: Gate 6 Still Threshold
    gate_7:
      move_threshold:
        name: Gate 7 Move Threshold
      still_threshold:
        name: Gate 7 Still Threshold
    gate_8:
      move_threshold:
        name: Gate 8 Move Threshold
      still_threshold:
        name: Gate 8 Still Threshold
    gate_9:
      move_threshold:
        name: Gate 9 Move Threshold
      still_threshold:
        name: Gate 9 Still Threshold
    gate_10:
      move_threshold:
        name: Gate 10 Move Threshold
      still_threshold:
        name: Gate 10 Still Threshold
    gate_11:
      move_threshold:
        name: Gate 11 Move Threshold
      still_threshold:
        name: Gate 11 Still Threshold
    gate_12:
      move_threshold:
        name: Gate 12 Move Threshold
      still_threshold:
        name: Gate 12 Still Threshold
    gate_13:
      move_threshold:
        name: Gate 13 Move Threshold
      still_threshold:
        name: Gate 13 Still Threshold
    gate_14:
      move_threshold:
        name: Gate 14 Move Threshold
      still_threshold:
        name: Gate 14 Still Threshold
    gate_15:
      move_threshold:
        name: Gate 15 Move Threshold
      still_threshold:
        name: Gate 15 Still Threshold

button:
  - platform: ld2420
    apply_config:
      name: Apply Config
    factory_reset:
      name: Factory Reset
    restart_module:
      name: Restart Module
    revert_config:
      name: Undo Edits

status_led:
pin: GPIO23Example LD2410C YAML Configuration
For additional ESPhome documentation see: https://esphome.io/components/sensor/ld2410
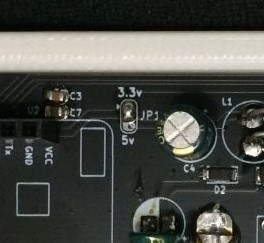
With the LD2410C the JP1 solder jumper must be changed to 5v.
# Version 2026.01.06
esphome:
  name: presence-1
  friendly_name: presence-1

esp32:
  board: esp32dev
  framework:
    type: arduino


# Enable logging
logger:
  baud_rate: 115200

# Enable Home Assistant API
api:
  encryption:
    key: "<your key>"

ota:
  password: "<your password>"

wifi:
  ssid: !secret wifi_ssid
  password: !secret wifi_password

  # Enable fallback hotspot (captive portal) in case wifi connection fails
  ap:
    ssid: presence-1
    password: ""

web_server:
  port: 80
uart:
  id: ld2410_uart
  tx_pin: GPIO17
  rx_pin: GPIO4
  baud_rate: 256000
  parity: NONE
  stop_bits: 1

ld2410:

# Uncommnet for night light model
#output:
#  - platform: ledc
#    id: pwm_output
#    pin: GPIO25
#    frequency: 500 Hz  # You can adjust the frequency if needed
#    inverted: false     # Set to true if you want inverted PWM signal

#light:
#  - platform: monochromatic
#    name: "PWM Light"
#    output: pwm_output
#    restore_mode: ALWAYS_OFF

sensor:
  - platform: ld2410
    light:
      name: light
    moving_distance:
      name : Moving Distance
    still_distance:
      name: Still Distance
    moving_energy:
      name: Move Energy
    still_energy:
      name: Still Energy
    detection_distance:
      name: Detection Distance
    g0:
      move_energy:
        name: g0 move energy
      still_energy:
        name: g0 still energy
    g1:
      move_energy:
        name: g1 move energy
      still_energy:
        name: g1 still energy
    g2:
      move_energy:
        name: g2 move energy
      still_energy:
        name: g2 still energy
    g3:
      move_energy:
        name: g3 move energy
      still_energy:
        name: g3 still energy
    g4:
      move_energy:
        name: g4 move energy
      still_energy:
        name: g4 still energy
    g5:
      move_energy:
        name: g5 move energy
      still_energy:
        name: g5 still energy
    g6:
      move_energy:
        name: g6 move energy
      still_energy:
        name: g6 still energy
    g7:
      move_energy:
        name: g7 move energy
      still_energy:
        name: g7 still energy
    g8:
      move_energy:
        name: g8 move energy
      still_energy:
        name: g8 still energy

number:
  - platform: ld2410
    timeout:
      name: timeout
    light_threshold:
      name: light threshold
    max_move_distance_gate:
      name: max move distance gate
    max_still_distance_gate:
      name: max still distance gate
    g0:
      move_threshold:
        name: g0 move threshold
      still_threshold:
        name: g0 still threshold
    g1:
      move_threshold:
        name: g1 move threshold
      still_threshold:
        name: g1 still threshold
    g2:
      move_threshold:
        name: g2 move threshold
      still_threshold:
        name: g2 still threshold
    g3:
      move_threshold:
        name: g3 move threshold
      still_threshold:
        name: g3 still threshold
    g4:
      move_threshold:
        name: g4 move threshold
      still_threshold:
        name: g4 still threshold
    g5:
      move_threshold:
        name: g5 move threshold
      still_threshold:
        name: g5 still threshold
    g6:
      move_threshold:
        name: g6 move threshold
      still_threshold:
        name: g6 still threshold
    g7:
      move_threshold:
        name: g7 move threshold
      still_threshold:
        name: g7 still threshold
    g8:
      move_threshold:
        name: g8 move threshold
      still_threshold:
        name: g8 still threshold

binary_sensor:
  - platform: ld2410
    has_target:
      name: Presence
    has_moving_target:
      name: Moving Target
    has_still_target:
      name: Still Target
  - platform: gpio
    pin: GPIO16
    name: gpio out pin presence
    device_class: presence

text_sensor:
  - platform: ld2410
    version:
      name: "firmware version"

switch:
  - platform: ld2410
    engineering_mode:
      name: "engineering mode"
  - platform: restart
    name: Restart

button:
  - platform: ld2410
    factory_reset:
      name: "factory reset"
    restart:
      name: "restart"
    query_params:
      name: query params

select:
  - platform: ld2410
    light_function:
      name: light function

status_led:
  pin: GPIO23
Captive Portal Method

With the PS1 already powered up for about 1 minute use a phone or other capable device connect to the PS1 default preinstalled captive portal AP SSID named presence-1 or similar. Some versions of ESPHome do not auto redirect to the portal. Use http://192.168.4.1 on the device you connected with in those cases.
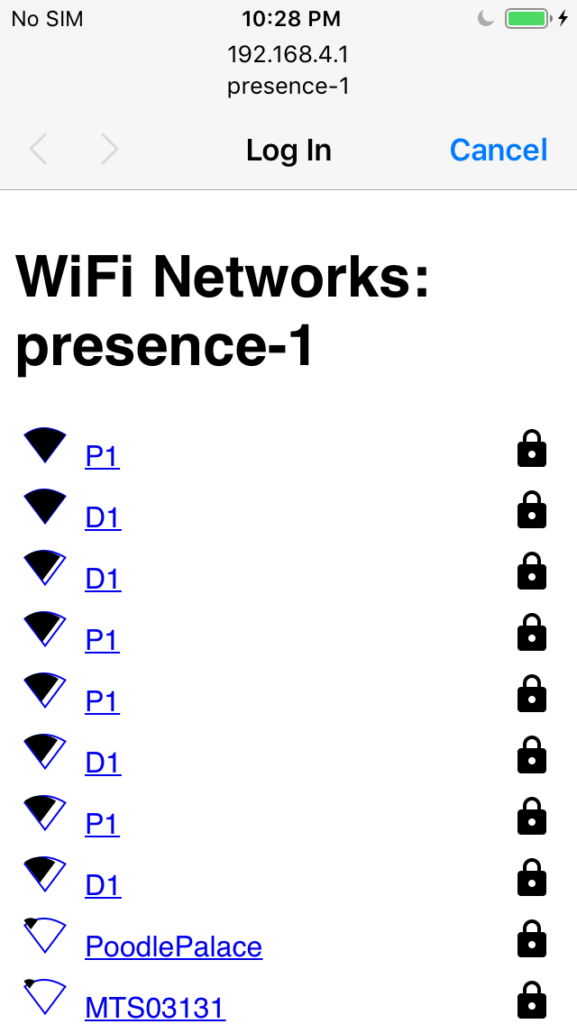
Set your SSID and Password .
After a minute or so visit the PS1 WEB portal using its mDNS address to verify it’s ready. Power cycle it if required.
http://presence-1.local
Prepare the firmware by selecting INSTALL on the top right of the ESPHome edit screen.
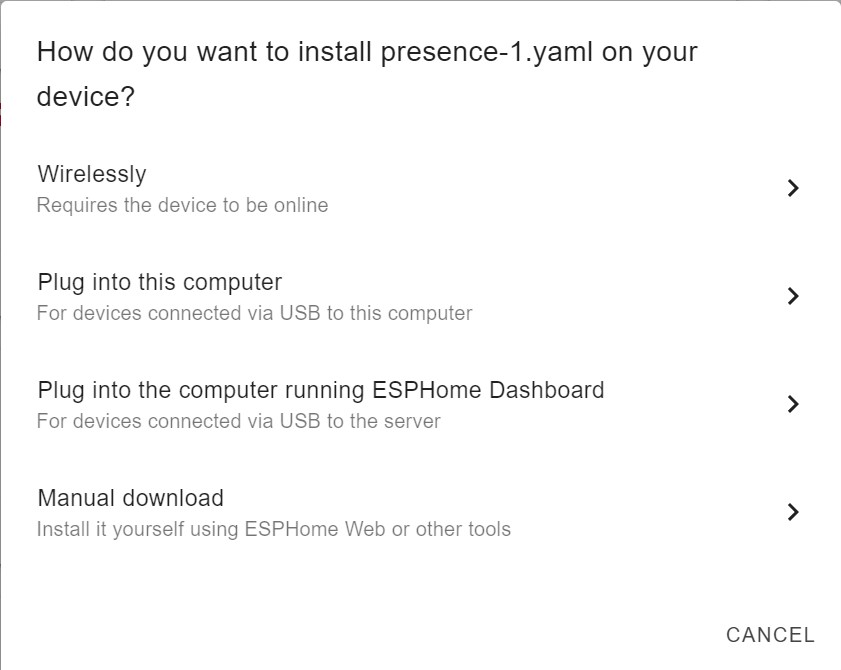
We need to select manual download since the the factory setting will not have an OTA password set, as a result we use the WEB UI to update the firmware with the registered device firmware build.
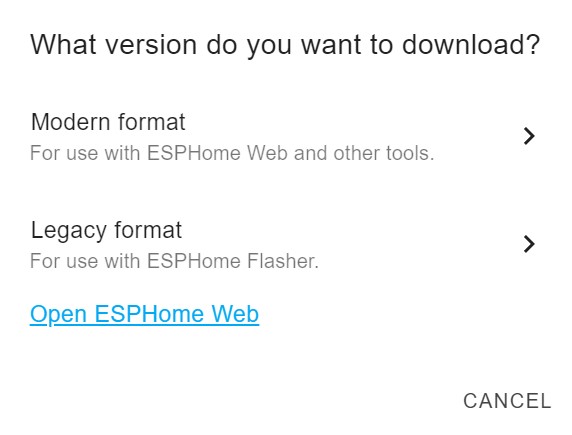
Be sure to generate the Legacy format and then proceed to selecting the file for the OTA upload.

We can now use the factory set WEB UI to upload the newly created firmware named gdo1.bin which is based on the device name.
The PS1 will now come online and you can add it to Home Assistant with the configured API encryption key.
Physical USB Serial Method
To enable flash mode on the PS1 you need to depress and hold SW1 then connect your USB to serial adapter to the UART flashing connector as shown here. Once power is applied the button can be released and PS1 will be in flash mode. (Pre-connecting J1 and then plugging in the USB end is usually easier)
Serial TX and RX pins should be crossed e.g.
J1    PS1 : USB Adapter
TX       ->    RX
RX       <-    TX
3.3v      -    3.5v Max
GND       -    GND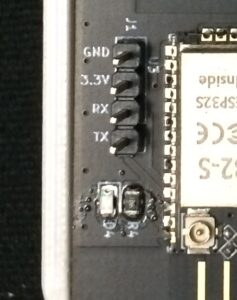
Prepare the firmware by selecting install on the top right of the ESPHome edit screen.
Select Plug into this computer.
PS1 will now come online and you can add it to Home Assistant with the configured key.
Night Light Equipped Automation
When you have a night light equipped unit you have a variety of automation methods with HA. This example automation will enable the light function of a PS1 named psnl1 to illumine at sundown and turn off at sunrise .
alias: Hallway Night Light
description: Hall Night Light Automation
triggers:
  - entity_id: binary_sensor.psnl1_presence_state
    trigger: state
  - event: sunrise
    trigger: sun
conditions: []
actions:
  - choose:
      - conditions:
          - condition: state
            entity_id: binary_sensor.psnl1_presence_state
            state: "on"
          - condition: or
            conditions:
              - condition: sun
                after: sunset
              - condition: sun
                before: sunrise
        sequence:
          - target:
              entity_id: light.psnl1_pwm_light
            data:
              brightness_pct: 100
            action: light.turn_on
      - conditions:
          - condition: or
            conditions:
              - condition: state
                entity_id: binary_sensor.psnl1_presence_state
                state: "off"
              - condition: sun
                after: sunrise
        sequence:
          - target:
              entity_id: light.psnl1_pwm_light
            action: light.turn_off
mode: single
This completes the PS1 setup Guide. For addition help please join the ESPHome discord site and ping @descipher or use the contact form on this sites menu https://www.gelidus.ca/contact-us/